Setup
How to install and set up the add-on for use in Blender.
Playable Workshop Tools for Blender is a comprehensive add-on that modernizes Blender for game development workflows. It provides a layer-based animation system, animation events, streamlined export operators for both 3D and 2D formats (including native Godot integration), and a collection of quality of life improvements for creating game-ready assets. The add-on requires Blender 4.2.0 or later (support for Blender 5+ is experimental).
This add-on is under active development. You may encounter bugs or incomplete features, and behavior can change between releases. Please report any issues on our Discord so we can address them.
Features at a glance
- Animation system — A layer-based animation system built for game development. Manage multiple animations per armature, use shared base poses, and layer different movements on top of each other with blend modes and influence controls.
- Animation events — Attach hitboxes, spawn points, and custom scripted events to your animations, then position and shape them directly in the viewport.
- Exporting — Per-object quick export with support for glTF, Godot GLB, Unreal FBX, Unity FBX, 2D skeletal (Pachario), and sprite sheet formats. The add-on handles animation baking and NLA setup automatically.
- 2D skeleton & sprite sheets — Export your armatures as 2D skeletal animations with atlas support, or render your animations into sprite sheets with Aseprite-compatible or Godot SpriteFrames output.
- Modeling tools — Quality of life improvements like a pie menu for vertex merging and a quick symmetrize operator.
Installation
The add-on is available to supporters through our Patreon. Once you have access, download the latest release from the Patreon posts. We appreciate your support as we continue to develop and improve the add-on.
The add-on is distributed as a .zip file. To install it, follow these steps:
- Open Blender and go to
Edit>Preferences. - In the Preferences window, select the
Add-onstab on the left sidebar. - Click on the
Install...button at the top of the window. - Navigate to the location where you downloaded the
.zipfile and select it. - After the installation, you should see the add-on listed in the Add-ons tab.
- You may need to enable the add-on by checking the box next to its name.
Have a question or found a bug? Join the Playable Workshop Discord to share feedback and get help from the community.
Preferences
The add-on has a number of features that span a variety of areas when it comes to game asset creation. Some people may not want to use all of these features, primarily ones that alter Blender’s default behavior or keymaps. To accommodate this, the add-on keeps its feature set highly configurable through its add-on preferences.
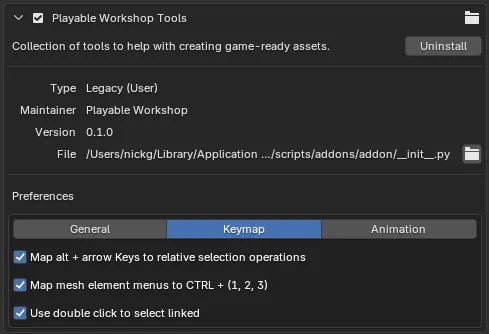
You’ll notice that the add-on preferences are divided into sections, each corresponding to a specific feature or area of functionality. More sections will be added as we continue to develop the add-on and add new configurable features.