Animation
Blender's animation system was created with video in mind, not games. This add-on provides a powerful set of tools to help you create game-ready animations.
Blender’s animation system is understandably designed for creating films within Blender, rather than animation specifically for rigged game characters to be used in external software, like game engines.
This creates several pain points when working on game development projects.
- It’s easy to make an animation in Blender where you forget to keyframe something like a base pose before you begin animating. When you switch to a different action and back, the unkeyed base pose could be overwritten if it was keyframed in the other action.
- There isn’t a straight forward layer system at a per-action level. We can kind of do this using the NLA editor, but it’s not the intended purpose and requires a lot of work to setup and maintain.
- It’s difficult to manage multiple actions, especially when you have a lot of them or they contain keyframes for other objects.
- Only exporting specific actions with your armature and model isn’t straightforward, and you have to remember to bake the actions down into a single action before exporting them. This can lead to missing animations or broken exports if you forget to do this step.
This add-on solves these problems by providing a custom interface for creating and managing animations and their “layers.”
In reality, this add-on provides a robust system over top of Blender’s NLA editor. This means if you are relying on the NLA editor for your workflow, you may lose your work as switching animations will overwrite the NLA tracks.
Currently there is no warning or confirmation dialog before this happens, though this is planned for a future release.
Getting started with the animation system
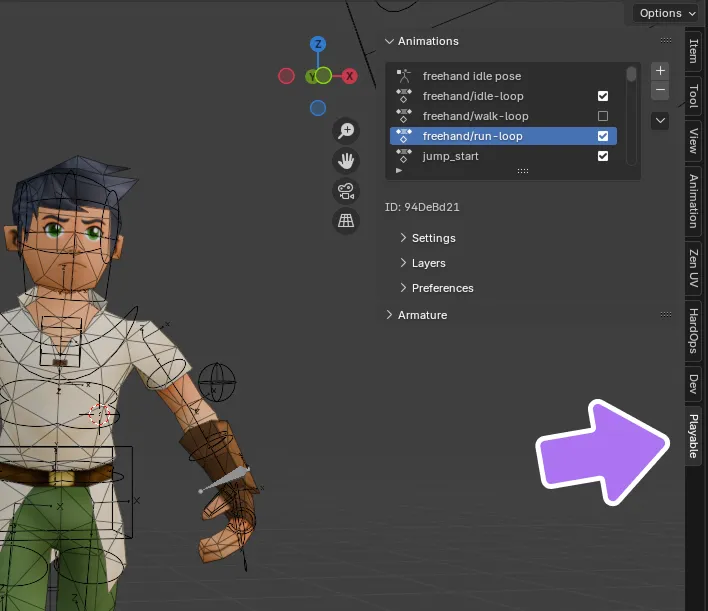
The animation system only works with armature objects. With an armature object selected, you can access the animation panel under the “Playable” tab in the right-hand side panel of the 3D viewport, which you can open with the n key.
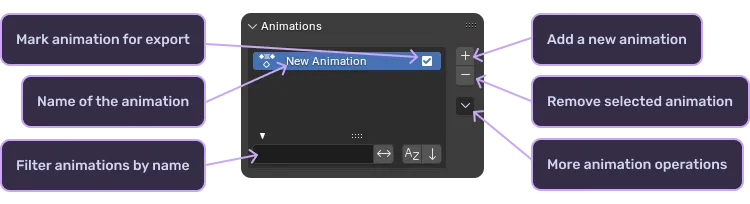
The first thing you’ll see is an empty list that will contain all of your animations and poses. You can use the button next to the list to create a new animation. The new animation will automatically be selected and you can start adding keyframes to it right away.
To rename the animation, double click on the name and type in a new name. To delete the animation, select it and click the button next to the list with the animation selected.
The animation system will automatically create a new action for you when you create a new animation. Each action created by the system has a unique ID as the name that starts with a period. This prevents the action from being displayed by default in the action editor.
Animation settings
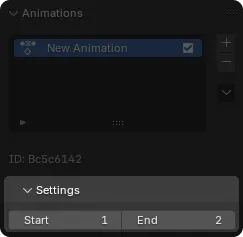
Underneath the animations list you can find the settings for the animation in the “Animation Settings” sub-panel. The main settings you’ll see here are the animation start and end frames, which determines the animation length. It’s set to be one frame long by default, but this can easily be changed by setting the end frame value.
The animation settings also include a Loop checkbox. Enabling it marks the animation as looping, which drives loop mode on export so engines that support it (such as Godot) import the clip already set to loop. It also enables seamless wrapping when generating procedural layers like Key Pose, so the simulated motion carries over cleanly from the last frame back to the first.
Customizing preferences on the fly
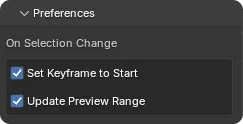
The “Preferences” sub-panel allows you to customize the addon preferences related to animations without having to go into Blender’s preferences window.
- Set Keyframe to Start will set the keyframe to the start frame of the animation when switching between animations.
- Update Preview Range will automatically update the preview range of the action editor and timeline to match the animation’s start and end frames.
Switching between animations
Clicking the button will create another animation and immediately select it. You can create as many animations as you want. When you select an animation, you’ll notice the animation settings, layers, NLA editor, and active action in the action editor change to reflect the selected animation.
Switching between animations will always reset the armature to its rest pose to ensure that the animation is in a clean state and that only keyframed properties remain. This prevents interference from previous animations and gives you a clean slate to work with.
Animation layers
When you first create an animation, it will automatically have two layers: a standard layer named “Main Action” and a base pose layer named “Base Pose.” This gives you a foundation to start building your animation immediately.
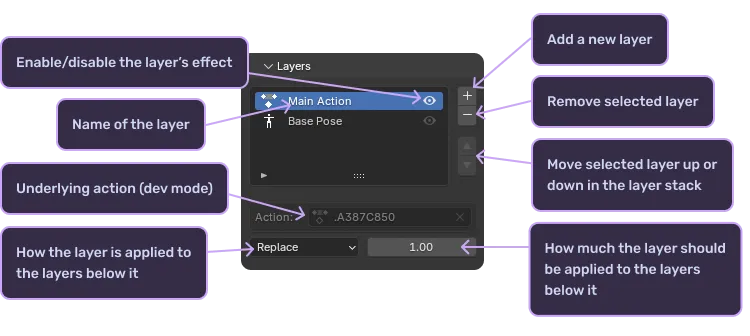
Layers can be reordered using the and buttons next to the layer list. This will move the selected layer up or down in the list, though it does not affect the base pose layer and you cannot place layers below the base pose layer.
More layers can be added using the button next to the layer list. This brings up a dialog panel where the name and type of the layer can be selected. You can choose between a Standard layer and a Key Pose layer. Keep in mind that the type of the layer cannot be changed after the layer is created.
Layers can be deleted using the button next to the layer list. Like animations, you can rename layers by double clicking on the name and typing in a new name. The icon on each layer will toggle the visibility of the layer in the viewport, which is useful for isolating specific parts of your animation.
Layers are applied top-down, meaning the topmost layer will affect the result of the layers below it. This allows you to create complex animations by layering different movements and poses on top of each other.
How each layer is applied to the resulting animation can be controlled using the “Blend Mode” dropdown. Five modes are available:
- Replace replaces the visual state of the armature with the current layer. This is the default.
- Combine replaces, adds, multiplies, or subtracts from the layers below on a per-channel basis, matching Blender’s own combine behavior.
- Add adds the layer’s transform on top of the layers below.
- Subtract subtracts the layer’s transform from the layers below.
- Multiply multiplies the layer’s transform with the layers below.
These modes let you build up complex results by stacking corrective or additive movement over a base action.
In addition to blend mode, there is “Influence”. This is a slider that allows you to scale the effect of the layer more gradually. You can use any value between (and including) 0 and 1, where 0 means no influence and 1 means full (or 100%) influence.
Layer types
There are three layer types available: “Base Pose”, “Standard”, and “Key Pose”.

Layer Type: Base Pose
This is a special layer that cannot be deleted or moved, and every animation has exactly one. It’s used to select what base pose to use for the animation. This allows you to create and reuse base poses across multiple animations, and any changes to the base pose will be reflected in all animations that use it.
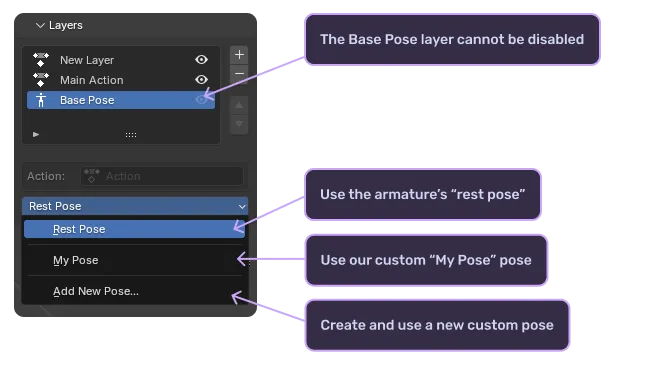
If no base pose is selected, the armature will use its rest pose.
Layer Type: Standard
This is a standard layer type, meaning it applies your animation on top of any layers below it, like the base pose layer. The typical use case for this layer type is to create your main action for the animation, such as walking, running, or jumping. You can add keyframes to this layer just like you would in a normal action.
You can then create additional layers above this layer to add secondary animations or effects. For example, you might create a layer for facial expressions or hand movements that will be applied on top of the main action.
Another useful feature of the standard layer type is that it can be used to create adjustments to your main action. This comes in handy if you need to change the resulting pose from a retargeted animation that doesn’t quite fit your character.
Layer Type: Key Pose
A Key Pose layer lets you author sparse key poses and their timing, then generate the in-between frames automatically using a spring simulation. Instead of hand-keying every frame, you set the important poses and let the add-on fill in follow-through and secondary motion between them. This is well suited to snappy, cartoony movement where you want overshoot and settle without keying it by hand.
To use it, add a new layer and choose the “Key Pose” type. Author your poses as ordinary keyframes on the layer, then press Generate to simulate the dense result. If you need to make changes, press Edit Key Poses to switch the layer back to your original sparse poses, adjust them, and generate again. Your authored poses are always preserved, so you can iterate freely.
The simulation is driven by a set of layer-level sliders:
- Coherence controls how exactly the generated motion hits your authored poses. A value of
1.0pins each key frame to its pose precisely while leaving the in-betweens free to follow through. Lower values let even the poses drift. - Inertia controls how much momentum the motion carries. Higher values maintain velocity longer, giving bigger, looser follow-through past the poses.
- Settle controls how quickly the motion eases into the rest poses. Low values are loose and laggy; high values track and settle tightly.
- Overshoot is the gain on carried momentum. A value of
1.0follows the natural motion, while higher values exaggerate overshoot for snappier results. - Iterations sets the number of simulation sub-steps per frame. Higher values are more stable and resolve fast motion more accurately.
- Smoothing applies post-simulation smoothing to the generated curves.
Individual bones can opt out of the layer sliders and use their own settings. With a bone selected, enable Override Key Pose in its per-bone settings to give it a custom Coherence, Inertia, Settle, and Overshoot. This is useful when one part of the character (such as a tail or antenna) needs looser follow-through than the rest.
If the animation is marked as looping, generation wraps the simulation seamlessly from the last frame back to the first so the motion is continuous across the loop point.
Poses
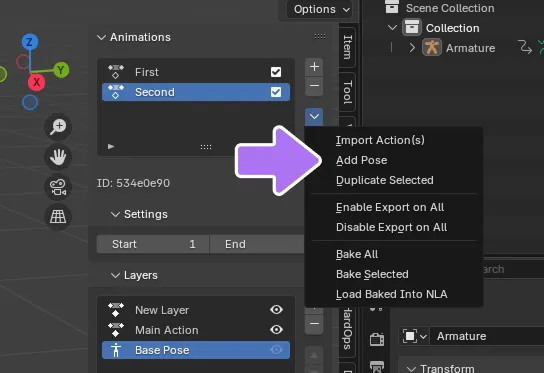
Poses are single frame tracks that are used to create shared base poses for your animations. For example, you can create poses for things like “standing”, “crouched”, and “falling”. To create a new pose you can use the button next to the animation and pose list and select the “Add Pose” option. This will create a new pose and automatically select it.
The poses used by this system are just standard actions and are not pose assets stored in the asset library. This may change in the future.
Poses are differentiated from animations by their icon and are not eligible for export. You can also choose to just use the rest pose for the armature by selecting the “Rest Pose” option in the “Select Pose” dropdown.
You can also create poses directly from the “Select pose” dropdown when the base pose layer is selected in any animation. Selecting “New Pose…” in the options list will automatically create a new pose and select it within the animation, but will not switch away from the current animation you are editing.
Importing existing actions as animations
If you already have an action that you created outside of this system, you can import it as an animation by pressing the button next to the animation list and selecting “Import Action.” This will create a new animation and copy the action’s keyframes into the “Main Action” layer created for you. This is particularly useful when transitioning from a traditional Blender workflow to using this system.
Duplicating animations
With an animation selected, you can duplicate it by pressing the button next to the animation list and selecting “Duplicate Animation.” This will create a new animation where all of the layers and keyframes are copied from the original animation. This is useful for creating variations of an animation without having to start from scratch. You might use this to create different intensity levels of the same basic movement or to experiment with different approaches while keeping your original work intact.
Preparing your animation for export
Next to each animation is a button that will open the “Animation Settings” sub-panel. This sub-panel contains a checkbox that will mark the animation for export. Only animations marked for export will be processed during the final export steps.
You can bake animations down into a final action by selecting the animation and pressing the button next to the animation list and selecting “Bake Selected” or “Bake All.” This process is required to prepare your animation for export, as it combines all the layers into a single action that external software can understand.
Once the baking is complete, you can use the “Load Baked Into NLA” command to load all baked actions into the NLA editor. This operator has an option to include all animations or only include animations that are marked for export. When exporting your model, make sure to select the “Export NLA” option in the export settings.
Alternatively, you can use our quick export feature to automatically perform the baking, loading, and exporting steps for you in a single operation. This streamlined approach reduces the chance of missing a step and ensures your animations export correctly.
Common issues and solutions
-
If your animation isn’t playing back correctly, first check the layer visibility settings and influence values. Sometimes layers can be accidentally hidden or set to zero influence, making it appear as though your animation has disappeared.
-
When base poses seem to be causing problems across multiple animations, remember that they’re shared resources. Changes to a base pose affect every animation that uses it. If you need to modify a base pose for just one animation, create a new pose specifically for that animation instead.